Let's Make.... A Chandelier, or An Easter Treat For Elizabeth

... And for everyone else, of course!
No sooner had the challenge, or hint, been given, than I leapt (read: slowly ambled) into action to bring you a tutorial on making a chandelier.
The chandeliers available to buy had always been problematic for me. One, usually eye-wateringly expensive and well, a bit garish or two, very tacky looking with too much gold visible. And also too big, always far too big.
I wanted a chandelier with minimal brass, maximum crystal.
A wax candle back in the day was extremely expensive. Having a chandelier was like parking a Ferrari in your dining room, finanically. I always laugh at period dramas when impoverished poets scribble away to the light of a giant candelabra with the nicest white bees wax candles. Oh, the inaccuracy!
(I also like to spot anachronistic china tea sets in TV dramas too. I'm looking at you 'Victoria', who in 1846 was seen to be sipping from a Cauldon teaset from 1953. Each to their own hobby, I suppose!)
Anyway, back to the chandelier. How to make it look as if it is dripping with crystals without breaking the bank. Swarkovski crystals are not the cheapest, but they are the sparkliest, so this will be a big bit of your budget. If you want to electrify your chandelier, this will also put up the final cost, but even then, it should be around 40 euros. So, not free, but certainy worth it. Especally if you have a good stash of things already.
Here is a lay-out of the things you will need to make a three arm chandelier.

1) brass wire - I used #34 beading wire
2) three arm support x1
3) cupola x3
4) cup x3
5) candle x3
6) bulb x3
7) plug x3
8) plastic tube for protecting paintbrushes x1
9) crystal beads, the smaller the better. I used swarovski 3mm faceted and round. Also a couple of larger drops.
You will also need super glue, pliers,scissors and time.
First of all, use the pliers to gently bend upwards each end of the three arm support

Until you get this shape:

Then glue in the brass cups into each hole, making sure you don't block the holes with the glue, as you are going to thread the wires through them later.

Attach the beading wire to one arm, and then thread on some beads to make swags. Attach the end of the wire to the next arm and continue. Here, I made two swags per arm.
Then glue in the candles and thread the wire up through the centre of the three arm support.

I also used a small brass spacer bead to gather the wires neatly together, but that's optional.

Now thread all of the wires together through the paint brush tube. IMPORTANT! Use some masking tape to keep the correct pairs of wires together, or you won't know which is which when it is time to wire them to their respective plugs. You could colour coordinate them as well.
Your chandelier should look something like this:

Now comes the top part. Loop a long length of brass wire through one of the gaps in the cupola, leaving a nice tail of extra wire, you'll need this later.
Thread on enough beads to reach from the top of the paint brush tube to the arm of the support. I needed 16 beads, but you will have to measure yours, as it depends on the length of the paint brush tube (or the height of the chandelier that you want).

Do the same thing two more times, making sure the wires are as equidistant as possible on the cupola. I am making a three-arm chandelier, so I need three beaded wires. A four-arm would need four, etc.

Now slide the electric wires up through the central hole in the cupola (I've shown you without the beads, for clarity).

Now we're going to attach the long beaded wires to the rest of the chandelier. This is why we needed the extra tails.

Divide the two wires, as above...
...and wrap them around the candle cups by twisting them together a few times.

When you have done this to each arm support, your chandelier should look something like this:

Very wobbly, at the moment, but we're not quite finished yet...

Now add extra brilliance by making more swags and drops. Use the beading wire to wrap lengths of beads where you want them. Some can hang from the candle cups, others from the extra gaps in the cupola (you can attach them to the bottom swags if you want) Here is a little sketch to clarify:

I even added a large tear drop crystal to the centre, you can get very creative at this point, depending on your supply of beads.

Straighten the wires, pop in the bulbs, thread the electrical wires through a hole in the ceiling, correctly match up the wires to the plugs...
(guess who didn't do that the first time and had to start ALL OVER AGAIN. I did it, so you don't have to!)
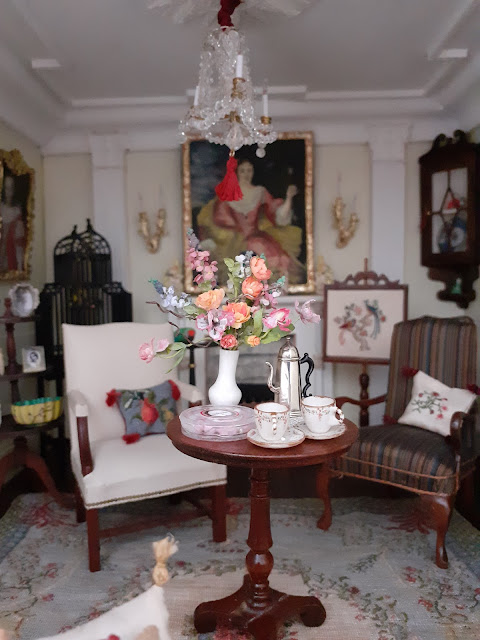
...And Hey Presto! You have a pretty, shiny, non-tacky, very brilliant chandelier for your house.
Well done you!
Happy Easter Weekend,
Jonquil


THANK YOU THANK YOU THANK YOU, Jonquil! 😃
ReplyDeleteYou've given me the courage and detailed instructions to give chandelier making a try - simply Brilliant! :D
I have been collecting crystals and beads for just such a project as this and I can't wait to give it a try!
By the way, I never would have noticed the anachronistic china tea sets used in t.v. drams, but I hear you loud and clear regarding the proliferation beeswax candles!
And I also agree that most chandelier are WAY TOO BIG for most dollhouses which is why I was So Impressed with the appropriate daintiness of yours.
Once again Thank You for this FAB tutorial and I wish you and your family, a Very Happy Easter Weekend! 😘❤️
elizabeth
Wow what a great tutorial for us all so beautiful made!!!
ReplyDeleteHave a safe and healthy easter!
groetjes van Marijke
Thank you for the tutorial, your chandelier is beautiful. I love your Easter decorations. Happy Easter!!!
ReplyDeleteGeneviève
A very stylish chandelier !! Thanks for the tutorial ...
ReplyDeleteAbsolutely brilliant, thank you so much for a taking the time to put this fab tutorial together.
ReplyDeleteHappy Easter.
Anna
¡Precioso trabajo!
ReplyDeleteGracias por el tutorial.
What a lovely room you have created. A fine setting for your chandelier - well done! It's a beautiful thing, all the more special because you created it yourself. I enjoyed the last few photos too, showing your table setting and the fine pieces you have collected. Hope you are well. Ix
ReplyDelete